Paramettrik Library adds one tab to your Revit ribbon and puts every family you can reach behind a single search: the model you have open, your office libraries, your past projects, and the cloud. This page is the user guide. Window by window, it shows what each button does and what happens when you click it. If you are still wondering whether the tool is for you, the product page is the better read; here we assume Paramettrik Library is installed and you want to get things done.
Finding your way around
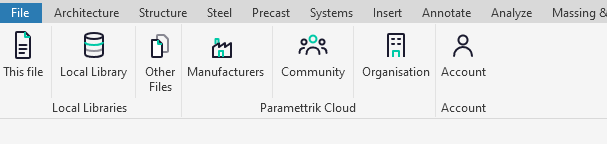
Everything starts from the Paramettrik tab in the Revit ribbon. Seven buttons, three groups:
- Local Libraries holds This File, Local Library and Other Files. These three work entirely on your machine: no account, no internet, nothing leaves Revit.
- Cloud Library holds Manufacturers, Community and Organisation. These three talk to the Paramettrik cloud, so they ask you to sign in with a free account.
- Account opens a small window where you sign in, check your license and set your preferences.
Every browser window is built on the same skeleton, so once you know one, you know them all. A thin sidebar on the left offers four views: Browse for the families themselves, Dashboard for what your library looks like in numbers, Manage for the housekeeping, and Settings.
The Settings view always ends with the same two groups. Appearance is where you switch between dark and light theme, pick one of the five interface languages and set the density of the card grid. License shows what your account unlocks. Change the theme or the language once, in any window, and every other window follows instantly.
One habit worth building from day one: the search bar. Every Browse view has one, always in the same place, and it is almost always the fastest route to the family you want.
See every family in your open model (This File)
This is the window you will probably open the most. It lists every family loaded in the Revit model you have open right now, whether it is placed somewhere or just sitting in the file. It is free and needs no account.
Browsing and cleaning up
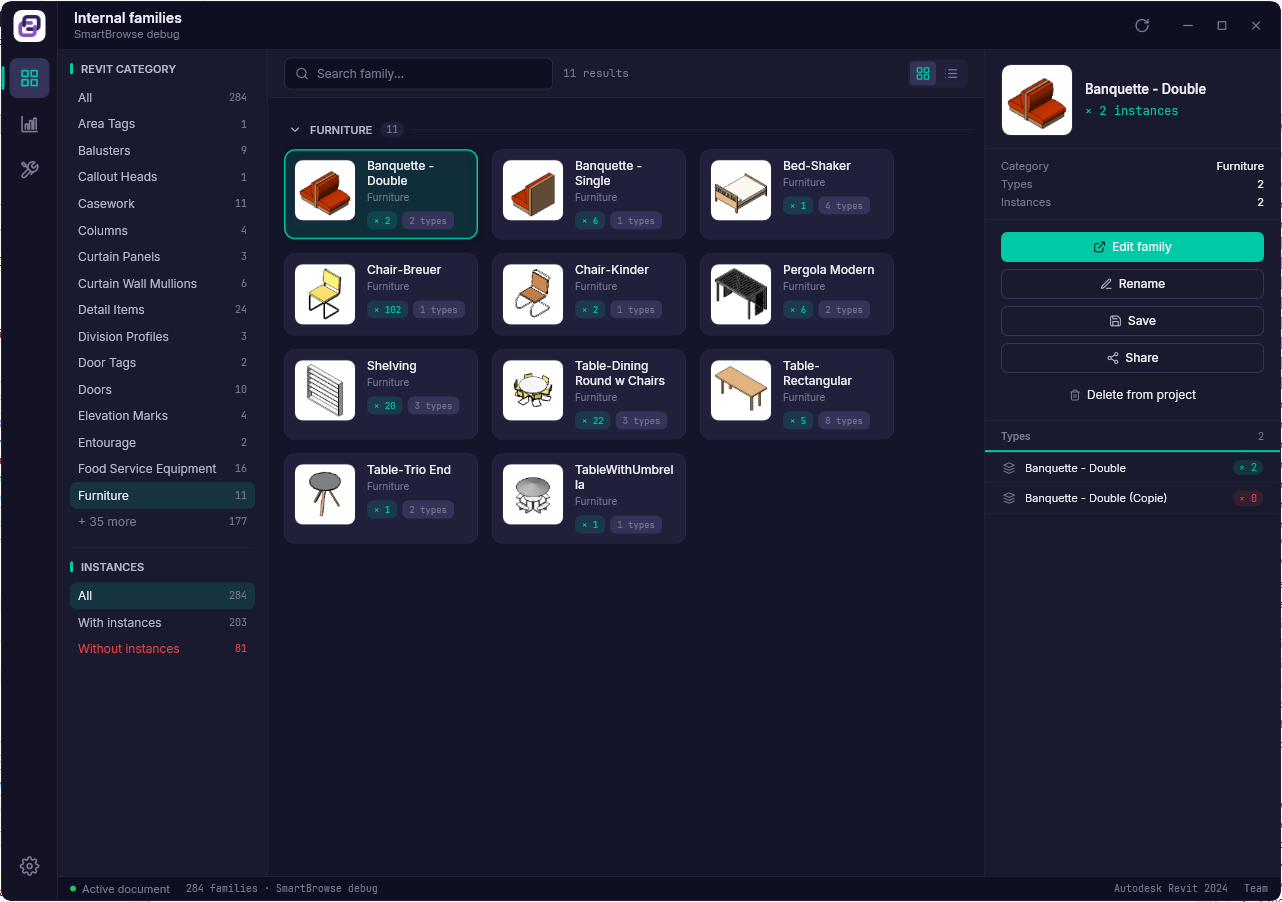
The left column filters. Revit category lists every category present in the model, each with its family count. Below it sits the Instances filter, the quiet hero of this window: With instances shows the families actually placed in the model, and Without instances, shown in red, shows the ones loaded but never used. That red list is exactly what makes your file heavier than it needs to be.
The middle shows family cards grouped by category, each with its preview, its number of types and its number of placed instances. A search bar sits on top, and the two icons on the right flip between the card grid and a compact list.
Select a family and the right panel wakes up. You get the preview, the category, the type and instance counts, and the list of types with the instance count of each one, so you can tell at a glance which type of that door is actually used. Then come the actions:
- Edit family opens the family in the Revit family editor, straight from here.
- Rename renames it in the project.
- Save writes the family out as an .rfa file, ready to join a library.
- Share opens the publish dialog to send it to your organisation or the community (see How to publish a family).
- Delete from project removes it from the model, with a confirmation first.
Reading the Dashboard
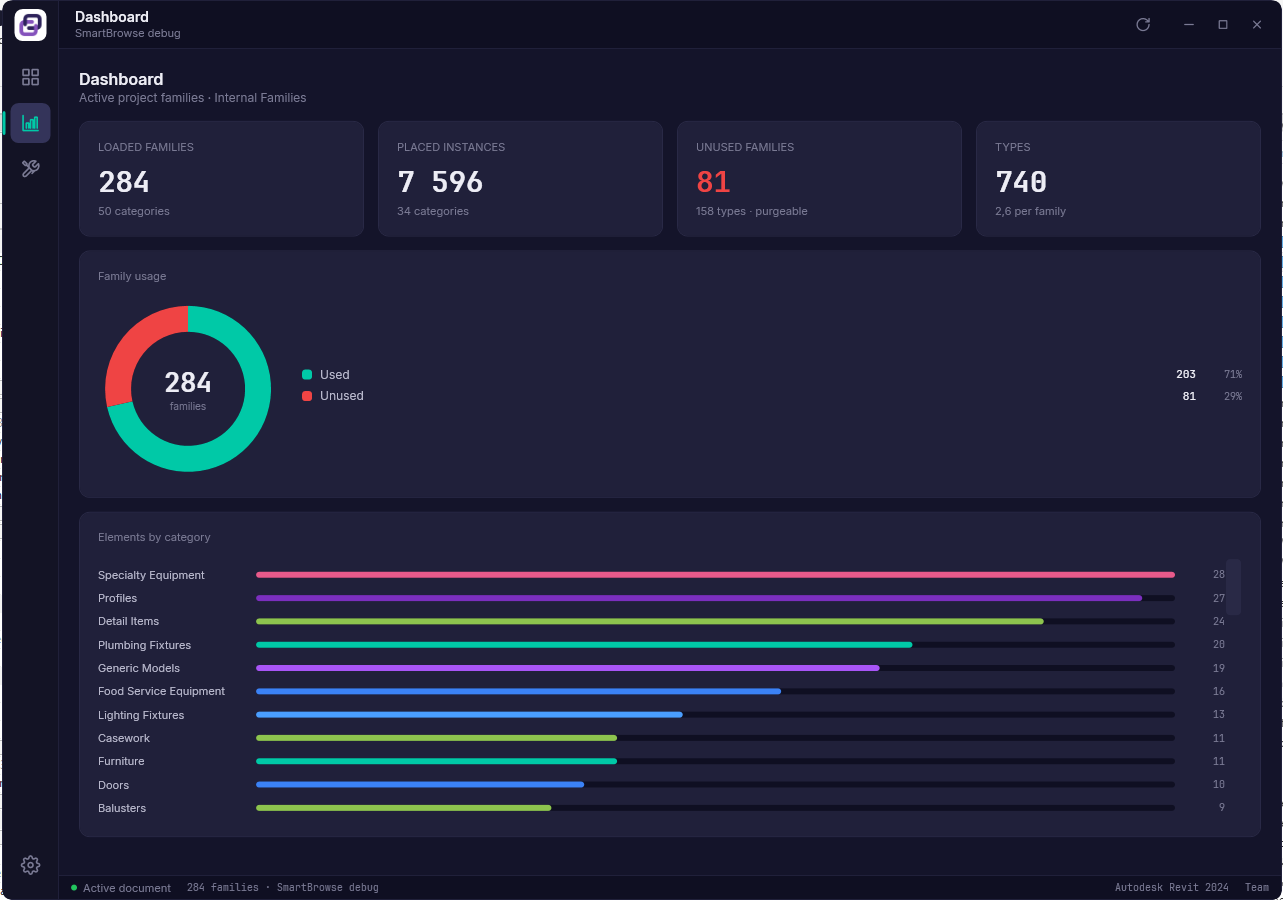
The Dashboard turns your model into four honest numbers: loaded families, placed instances, unused families and total types. The donut in the middle splits your families into Used and Unused, and the bars below count families per category. Open this view the day before a submission and you know within five seconds whether the model needs a cleanup pass.
Manage: reload and export
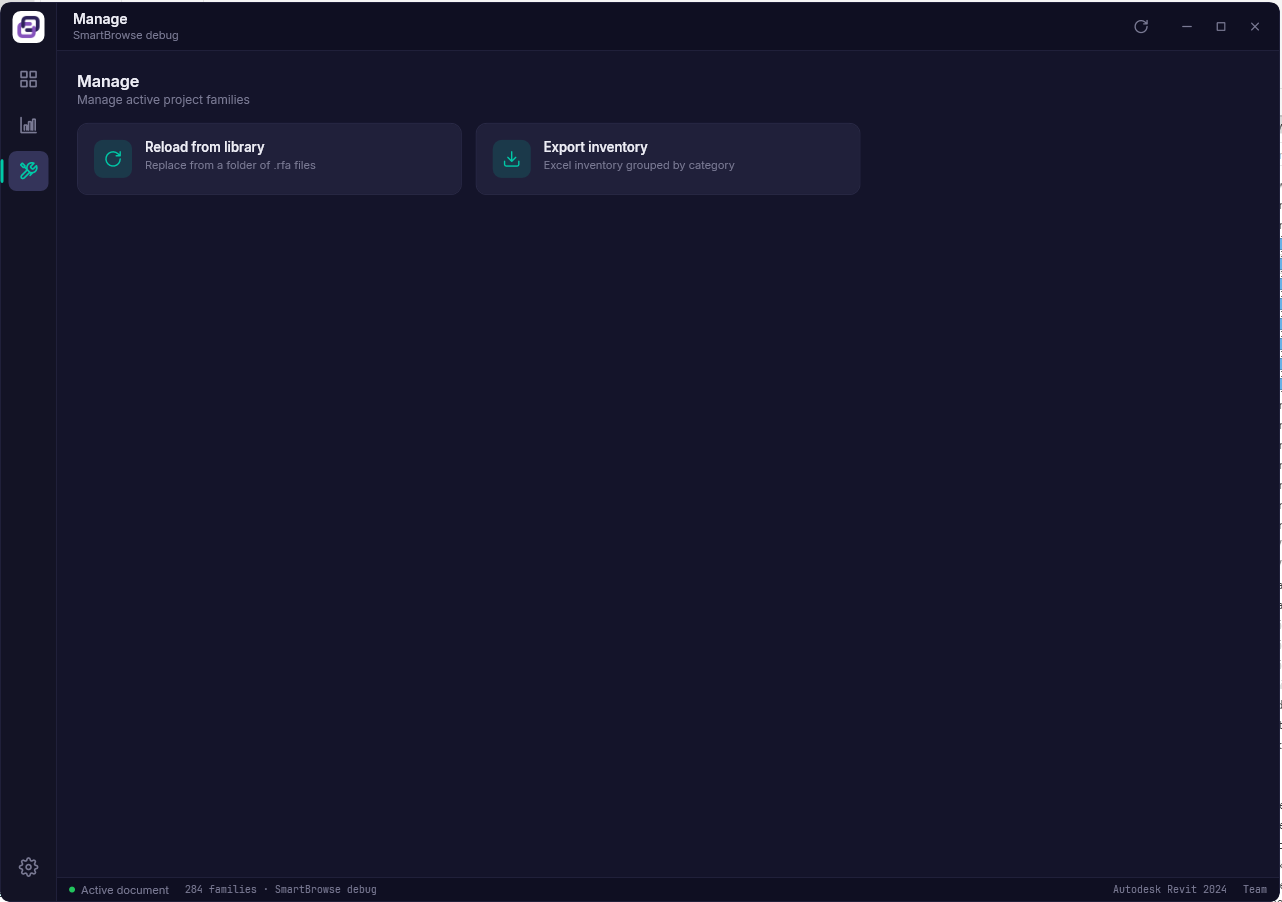
Reload from library points at a folder of .rfa files and replaces the loaded families with the versions found there. It is careful by design: a family with placed instances is only reloaded if every type in use still exists in the new file, and anything skipped is reported back to you. A reload never silently deletes placed elements.
Export inventory writes an Excel file: one sheet lists the families by category, a second lists every type with its instance count. Handy as a deliverable, or as a to-do list for a model audit.
Settings
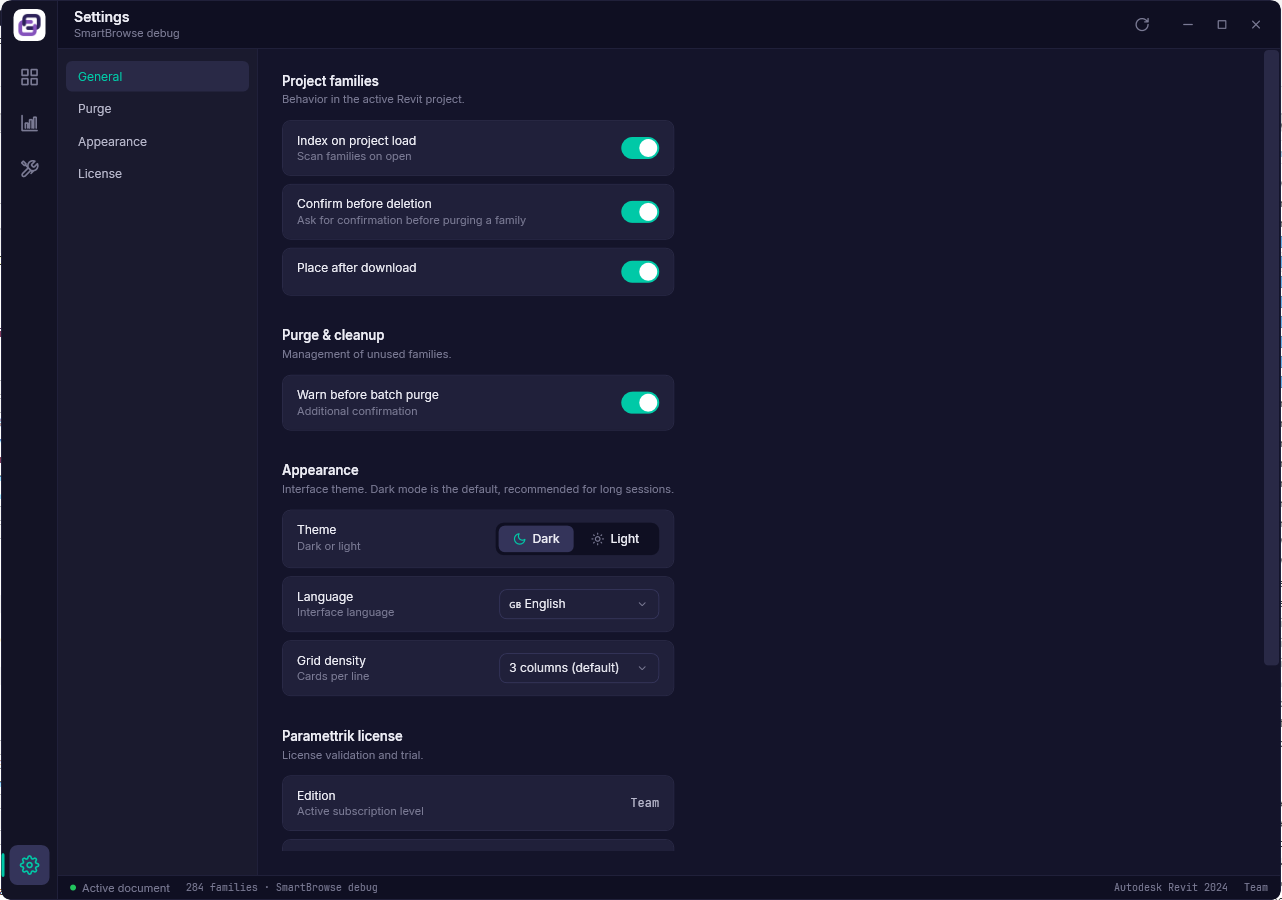
Here you decide whether the window scans the model automatically when it opens (Index on project load), whether deletions ask for confirmation first, whether placement starts right after a download, and whether batch purges get an extra warning. Our advice: leave the confirmations on. They have saved more than one Friday afternoon.
Load families from your office library (Local Library)
Your firm probably keeps its families in shared folders somewhere on the network, and finding the right one usually means a long walk through Windows Explorer. This window replaces the walk. Point it at your library folders once; it indexes them and gives you search, a folder tree and one-click loading. It is free and needs no account.
A word on how the indexing works, because it explains the speed: Paramettrik Library reads each file's name, folder, size and date without opening it. That is why indexing thousands of families takes seconds, and why the cards show file facts rather than family internals.
Browsing your sources
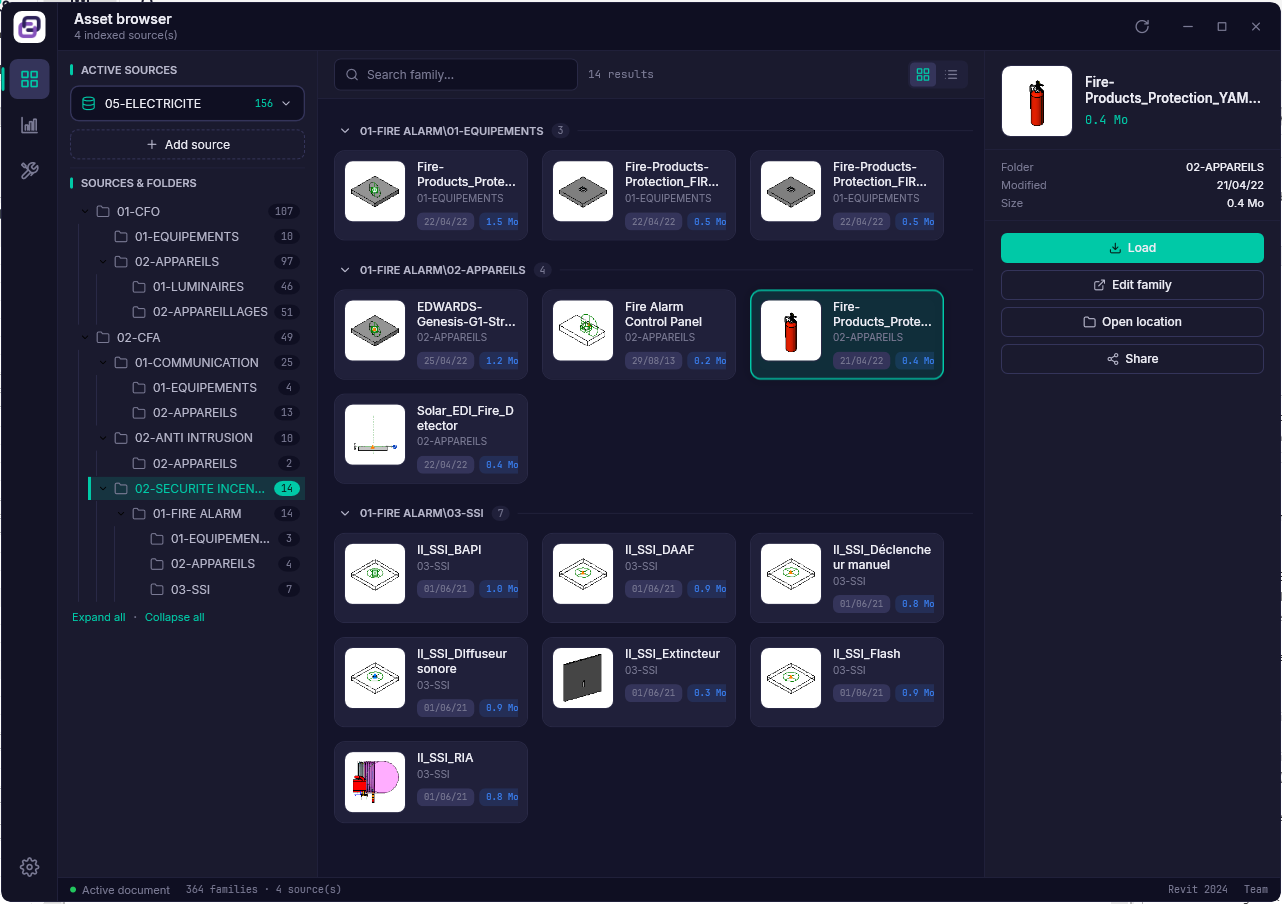
The first time, click Add source and pick a folder (a local one or a network share, both work). You can add as many sources as you like. The combo box at the top switches between them, the folder tree below mirrors the real folder structure with a family count on each folder, and Expand all and Collapse all spare your mouse wheel on deep trees.
Type in the search bar and Paramettrik Library looks through every indexed family of the source at once. Cards show the preview, the containing folder, the file date and the file size. Select one, and the right panel offers:
- Load, the button you came for: it loads the family into your open model, and if the Place after download setting is on, Revit starts placing it right away.
- Edit family opens the .rfa in the family editor.
- Open location opens the file's folder in Windows Explorer.
- Share opens the publish dialog.
Reading the Dashboard
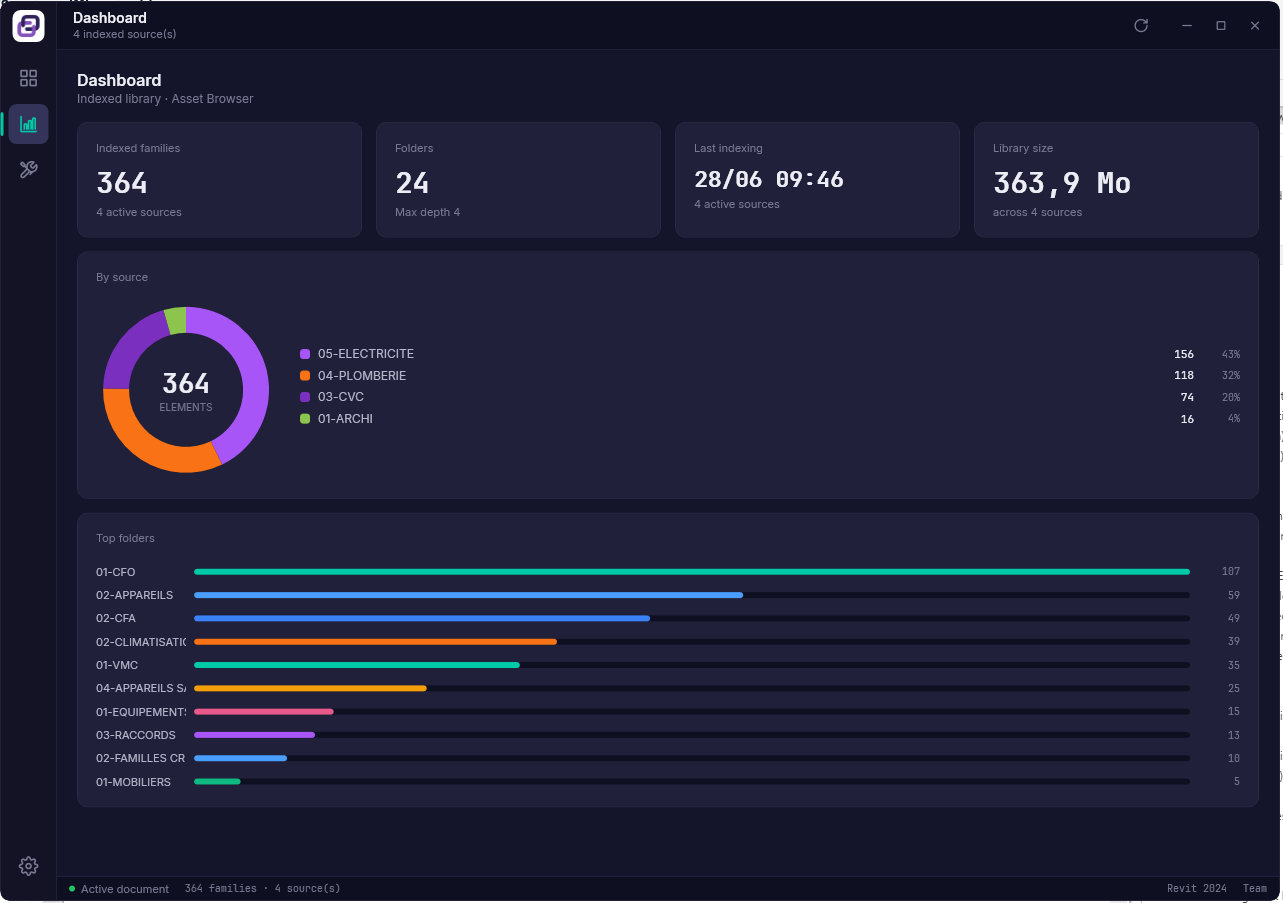
Four cards sum up the library: how many families are indexed, across how many folders, when the last indexing ran and how much disk the whole thing weighs. The donut splits families by source and the bars rank your biggest folders. If you have ever wondered which of your library folders has quietly become a dumping ground, the answer is here.
Manage: sources, duplicates and cache
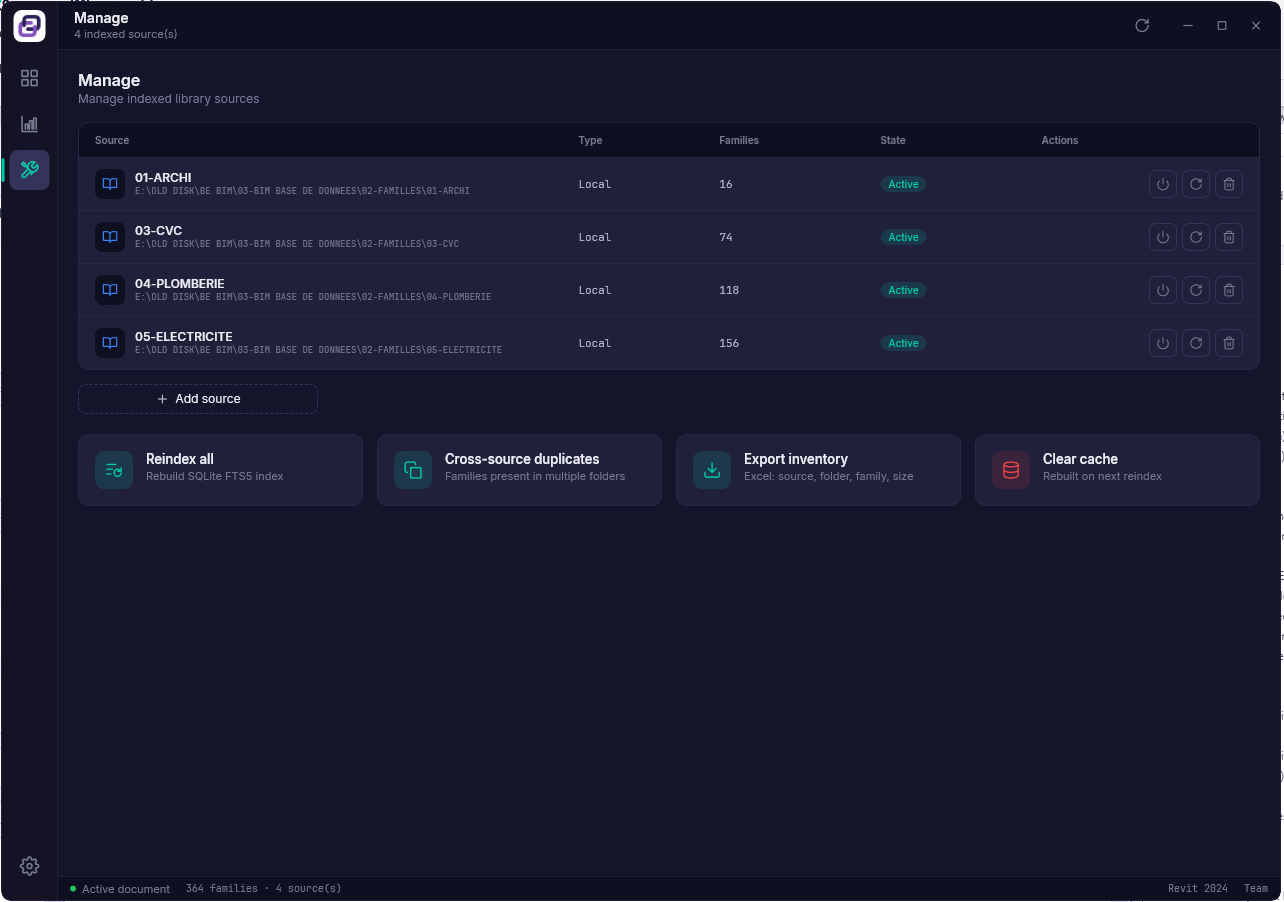
The table lists your sources with their family count and state, plus per-source buttons to disable, reindex or remove one. Below it, four tiles:
- Reindex all rebuilds the whole index, for the days when the library changed a lot at once.
- Cross-source duplicates finds families that exist in several folders under the same name, a classic in libraries that grew over the years. You get a report window listing each duplicate and where its copies live.
- Export inventory writes an Excel file with source, folder, family, size and date. An instant photograph of your library.
- Clear cache empties the local index; it is rebuilt on the next indexing.
Settings
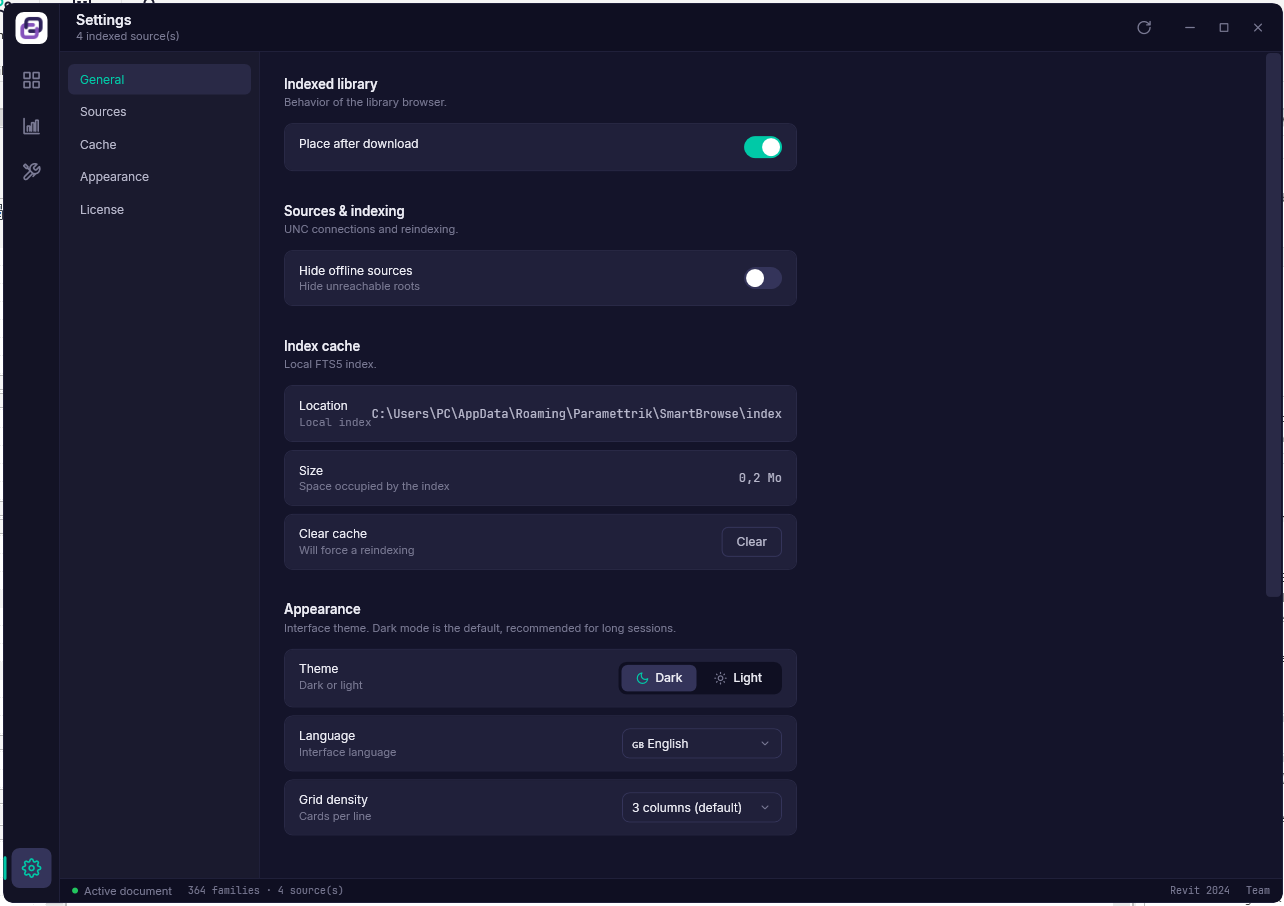
Hide offline sources keeps unreachable network shares out of your way, useful on a laptop that leaves the office. The Index cache group shows where the local index lives and how little space it takes, with a Clear button next to it.
Reuse families from past projects and templates (Other Files)
Somewhere in a project you delivered two years ago sits exactly the family you need today. And your office template, the one file everybody starts from, is usually the best kept family collection in the practice. This window reads both without opening either: add a .rvt project or a .rte template, Paramettrik Library reads its families in the background, and you extract the one you want straight into your current model. This window comes with the Library module.
Browsing another file's families
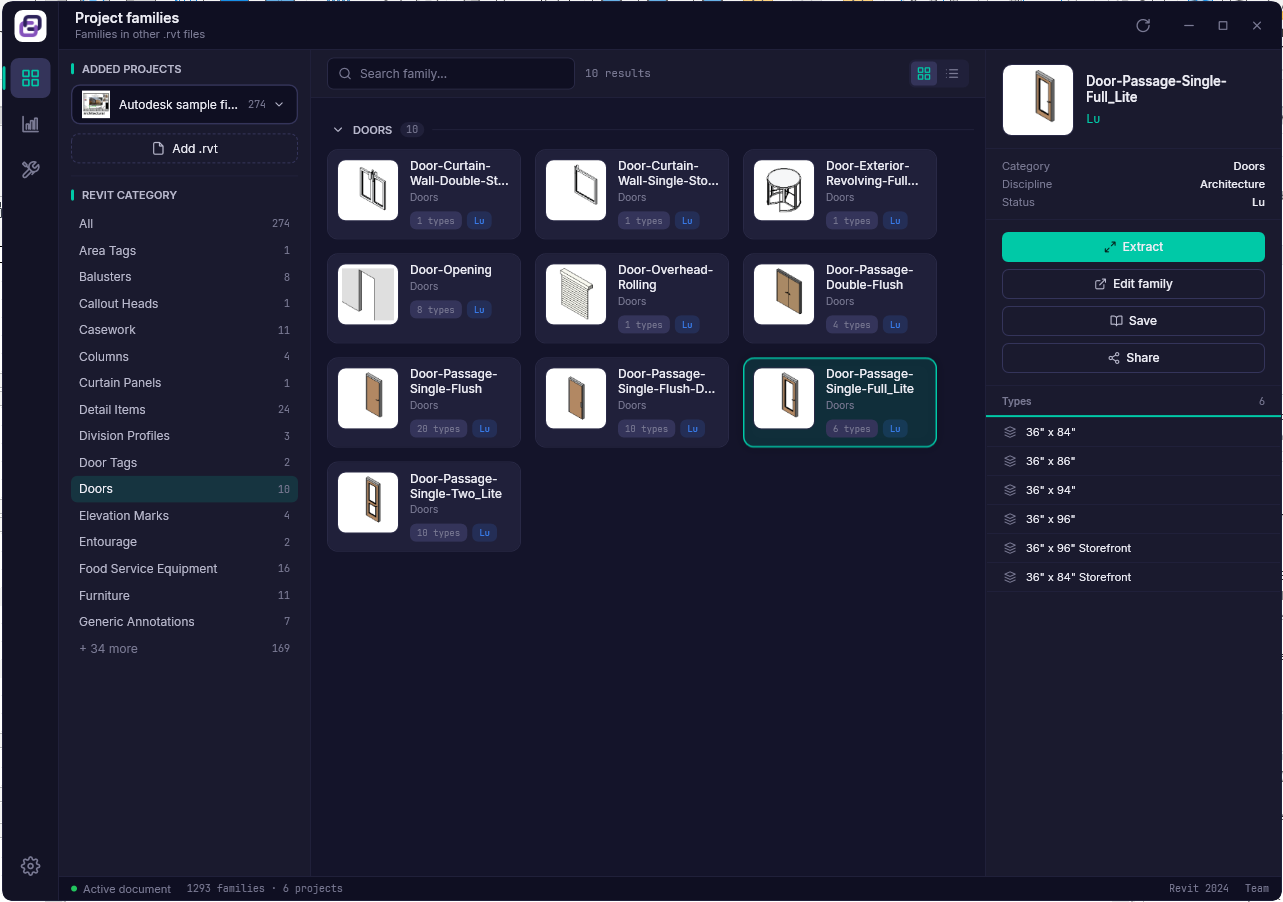
Click Add source and pick a Revit project (.rvt) or a project template (.rte), the two formats this window reads. Paramettrik Library reads the file without opening it in Revit, so your session stays untouched. A template is never touched either: its contents are instantiated in a temporary document in memory, so the .rte on disk keeps its modification date. A progress indicator keeps you posted, and the families appear grouped by category, with the same search bar and category filter as everywhere else. One guard worth knowing about: a file saved in a Revit version newer than the one you are running cannot be read (Revit does not allow reading forward), and Paramettrik Library tells you so before anything happens rather than failing halfway.
Each card shows the family, its type count and a small badge once it has been fully read. The right panel shows the category, discipline and types of the selected family, then the actions:
- Extract, the main event: it brings the family from the source file into your open model, ready to place.
- Edit family opens it in the family editor, on a temporary copy, so the source file is never modified.
- Save writes it out as an .rfa file, perfect for feeding your office library.
- Share opens the publish dialog.
Dashboard, Manage and Settings
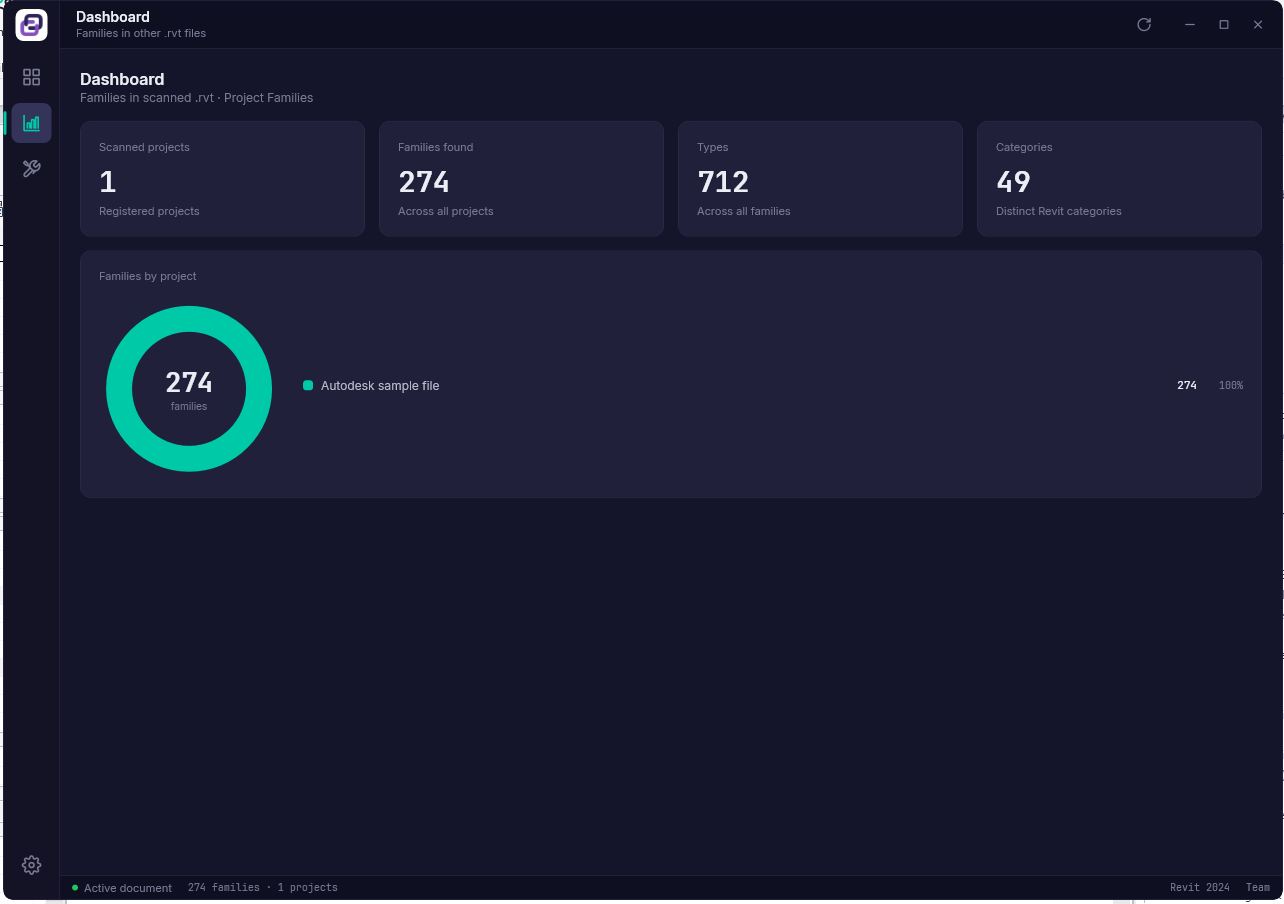
The Dashboard counts your scanned sources, their families, types and categories, and the donut shows how the families spread across them.
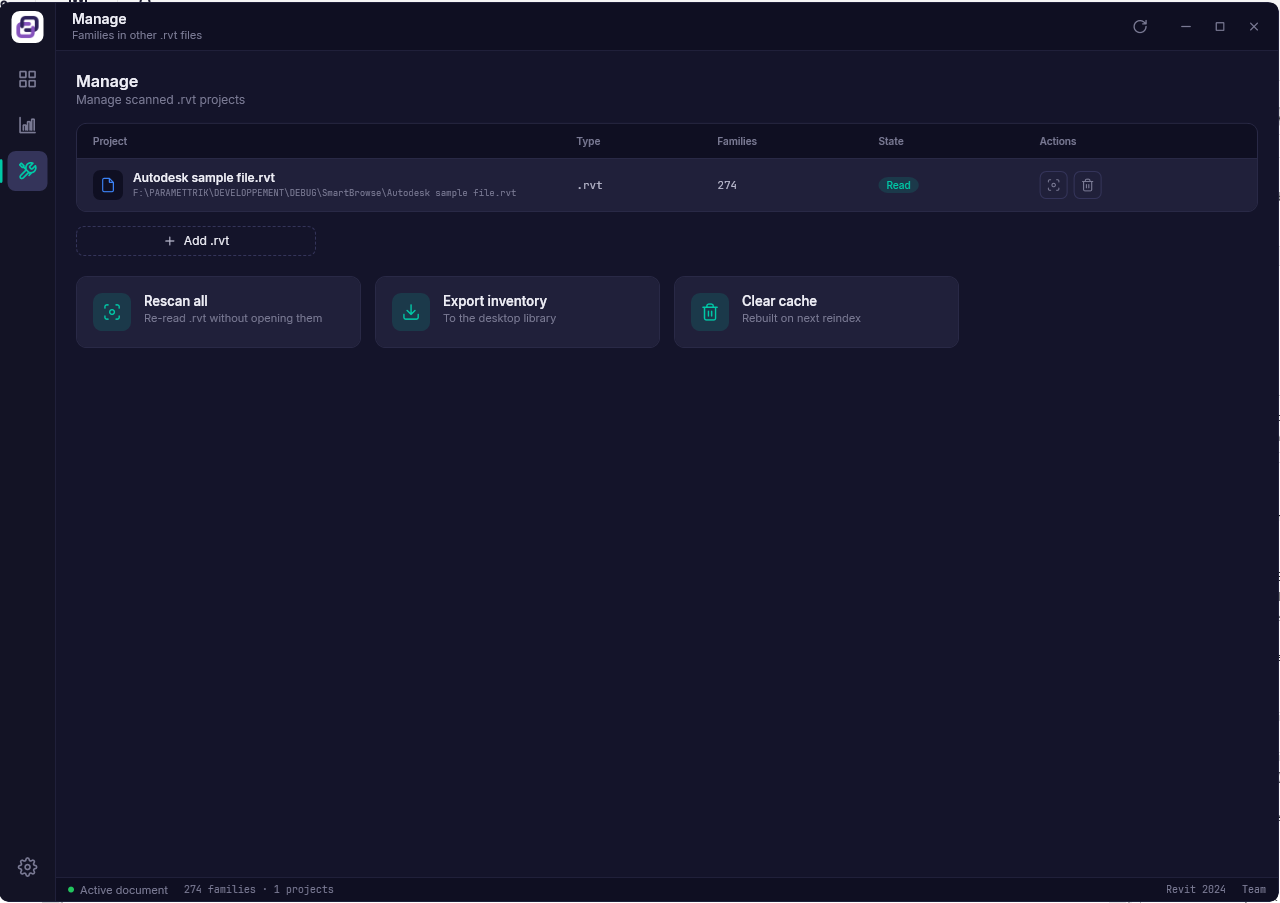
Manage lists the added sources with their state and lets you rescan or remove each one. Rescan all re-reads every project and template (still without opening them), Export inventory writes the Excel inventory, and Clear cache forces a fresh read next time.
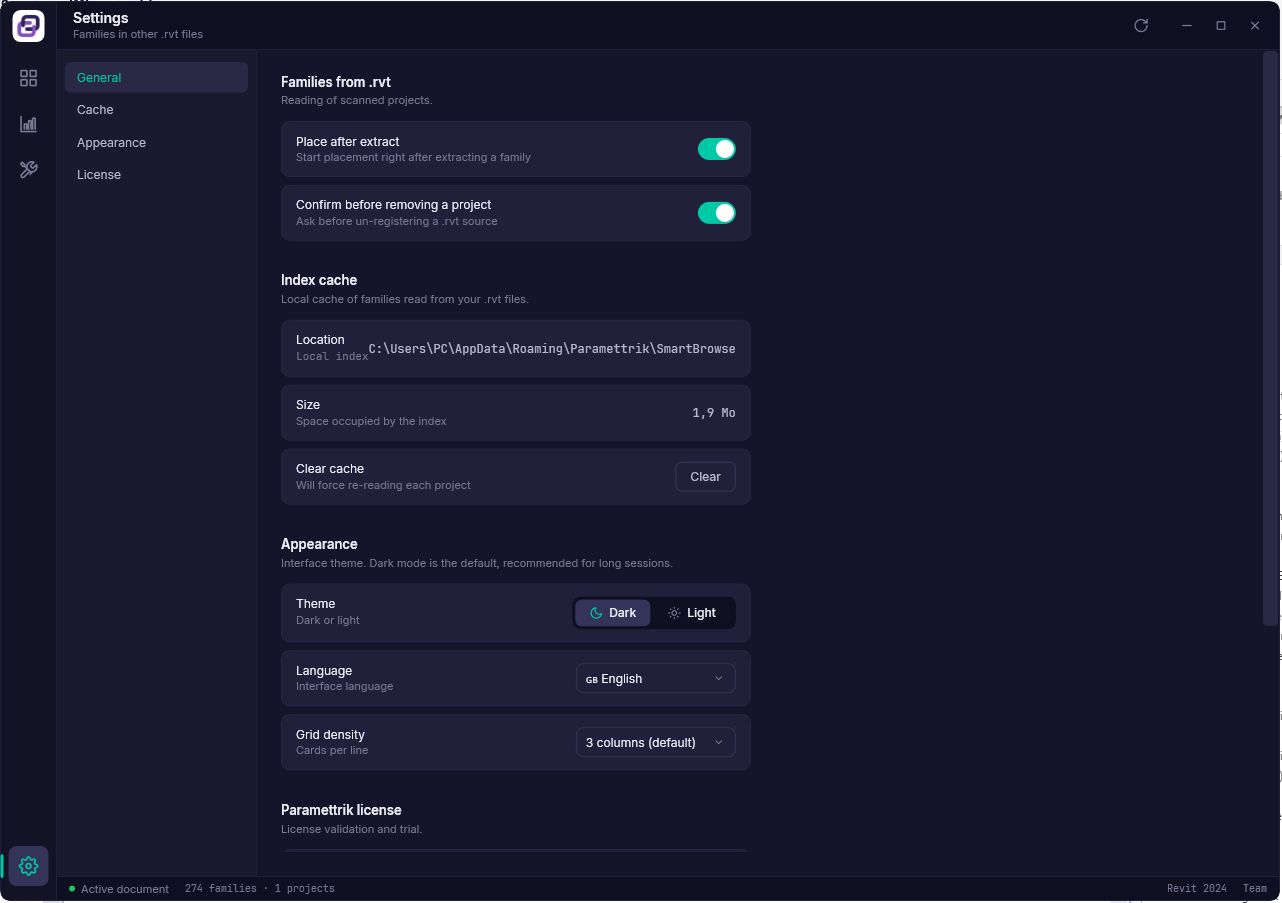
Two settings are specific to this window: Place after extract, so Revit starts placing the family as soon as it lands in your model, and Confirm before removing a project, which we suggest keeping on.
One free account for the cloud
The three local windows never ask you to sign in. The three cloud windows do, because they talk to the Paramettrik cloud on your behalf. The account is free and takes about a minute to create.
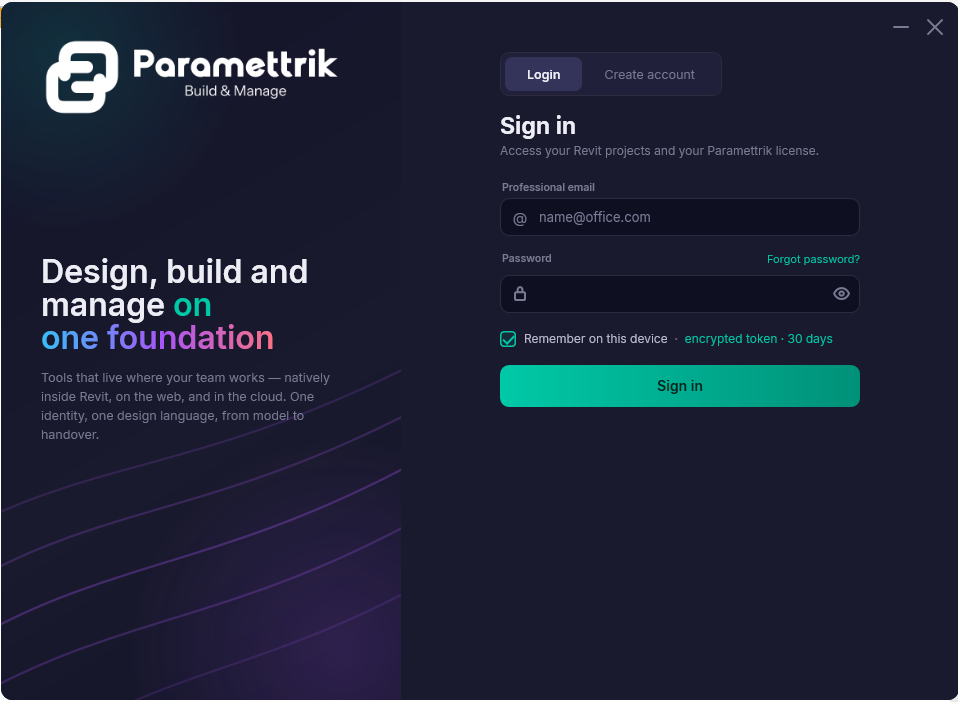
Click Account in the ribbon (or open any cloud window, it will ask by itself) and either sign in or create your account with a professional email and a password. Tick Remember on this device and Paramettrik Library keeps you signed in for thirty days, with the token stored encrypted on your machine, so you will not be typing your password every morning.
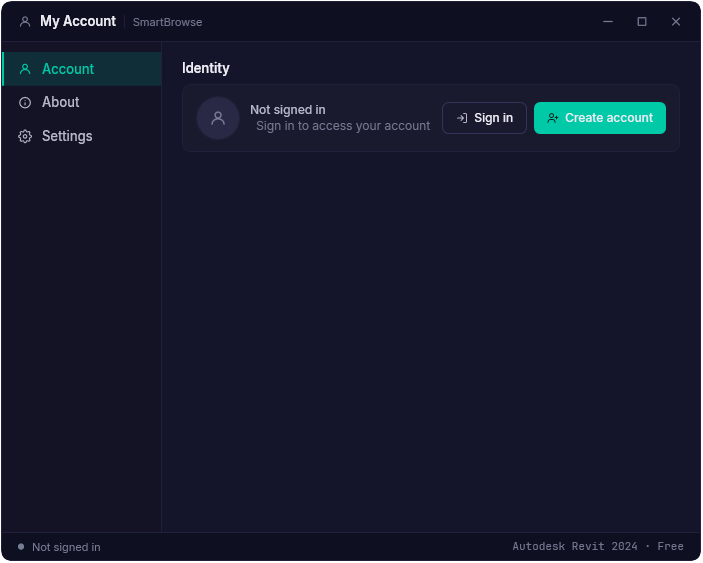
The Account window is also where you check what your account unlocks and manage your preferences. One account works everywhere: in the plugin, on the paramettrik.com website, and on every machine you work from.
And to say it plainly, because it matters: browsing locally sends nothing anywhere. Data leaves your machine only when you explicitly publish or download, and the cloud library is hosted in the European Union.
Download manufacturer families (Manufacturers)
Real products from real manufacturers, as BIM-ready families you can drop into your model. The Manufacturers window is free with your account: browse the brands, open one, and download what you need.
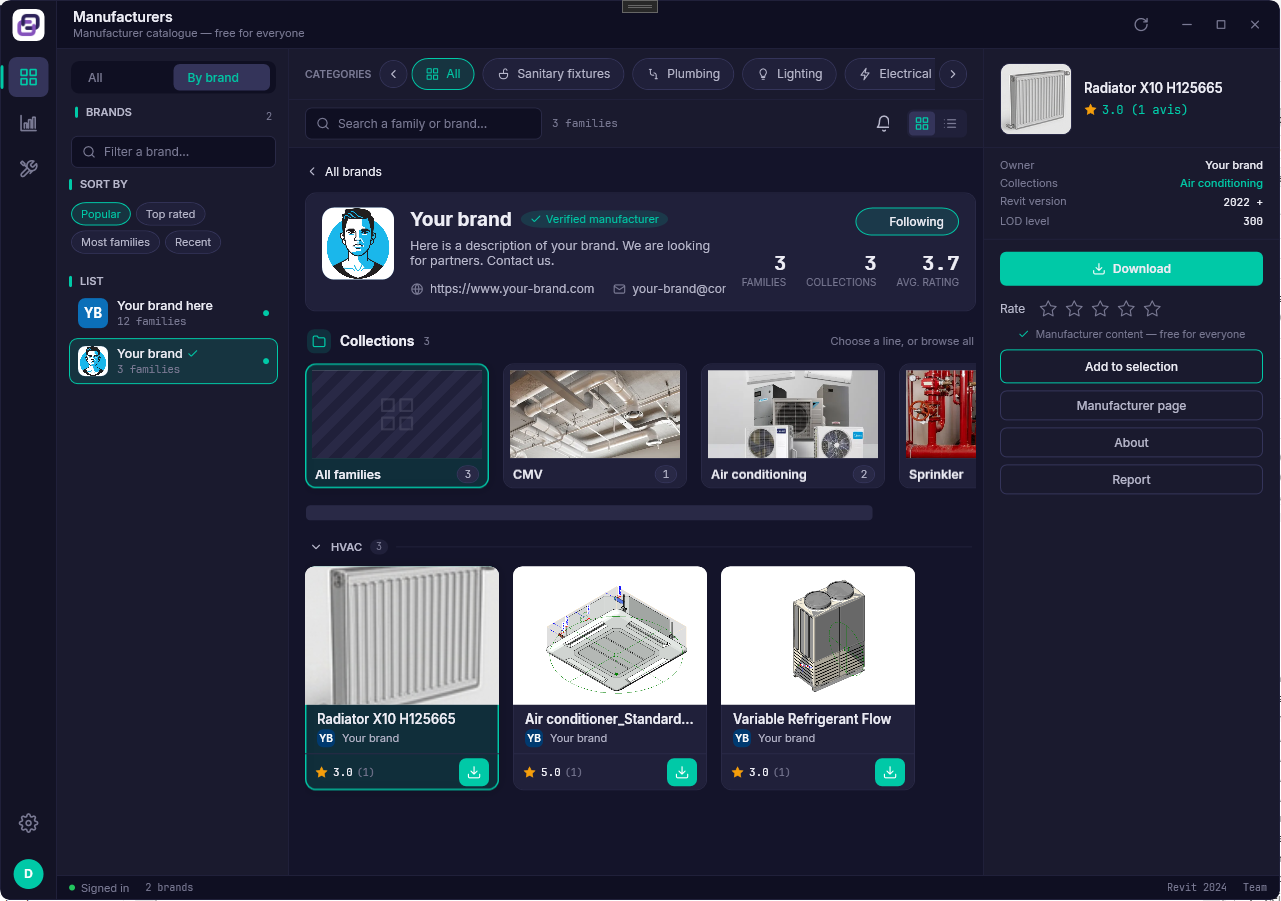
The left rail lists the available brands. Pick one and its page opens: the brand banner on top, then its families grouped by product category, with a category strip to jump around. Select a family and the right panel shows its details, its product sheet when the manufacturer provided one, and the Download button that loads it straight into your model. You can also rate a family with the stars in the panel; the average helps everyone see what is worth downloading.
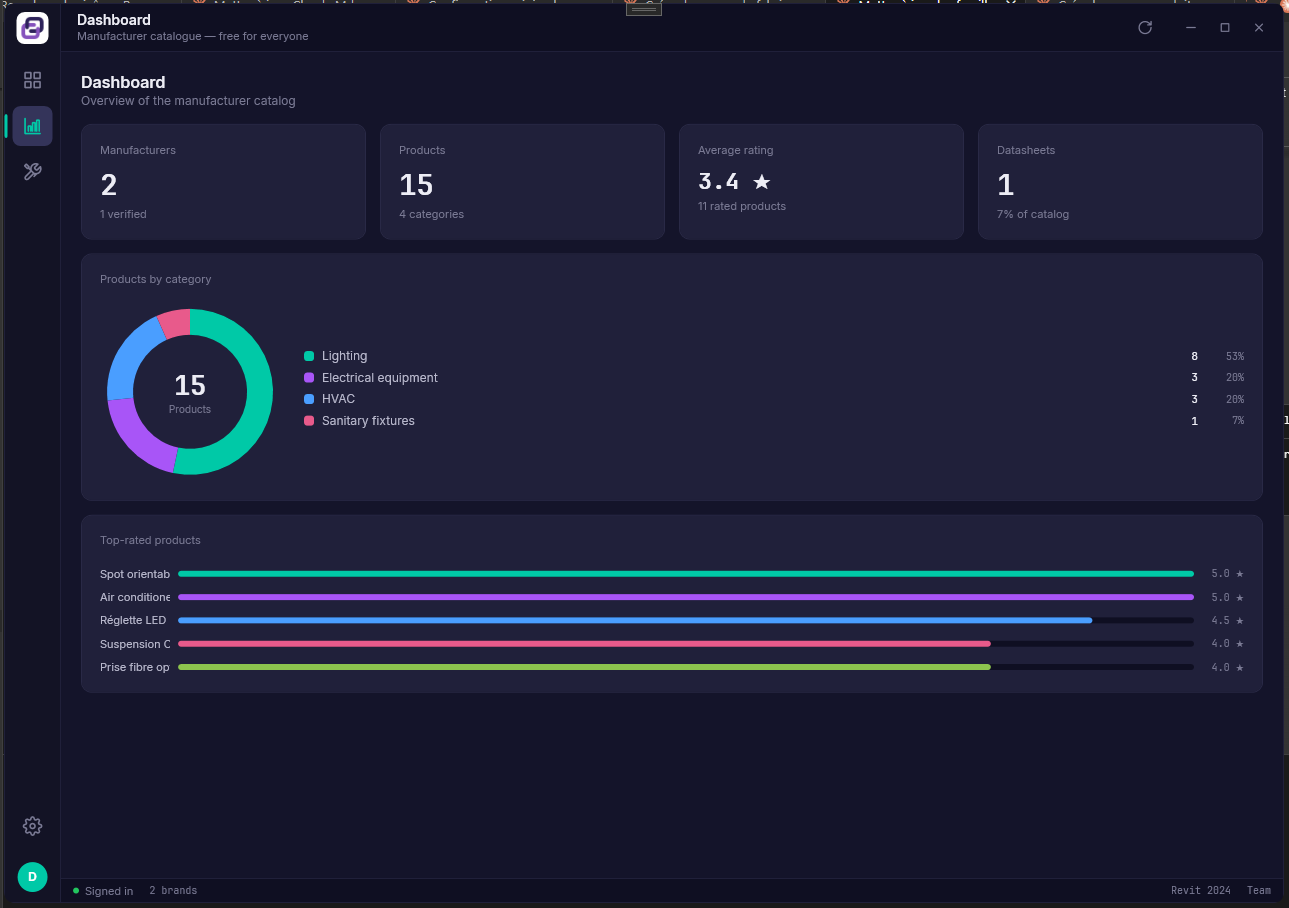
The Dashboard gives you the catalogue at a glance: how many families, how many brands, and the donut of families per category.
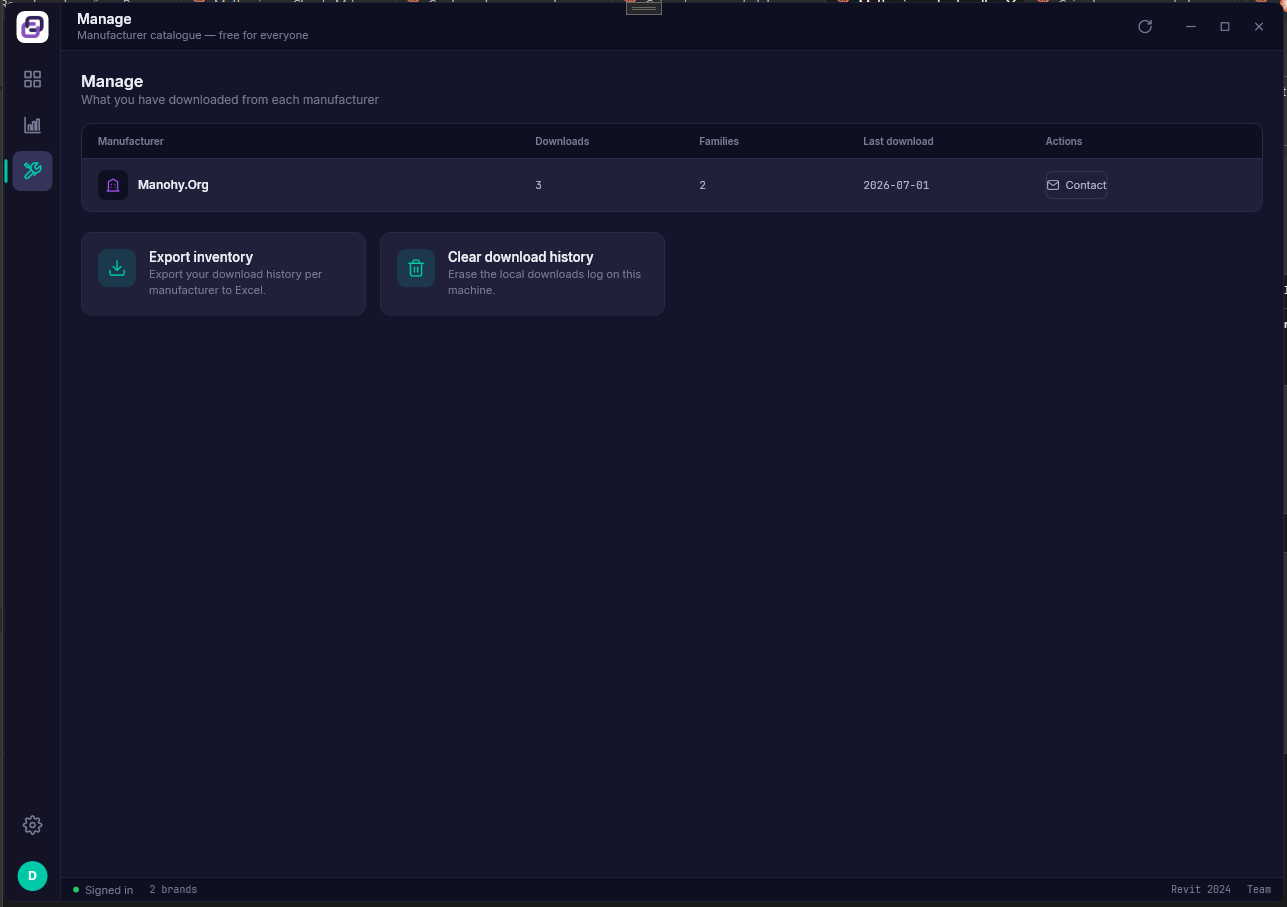
Manage keeps your own download history, grouped by manufacturer: how many families you took from each, and when. It stays on your machine. Each line has a Contact button that opens an email to the manufacturer, convenient when a question about a product comes up mid-project. You can export the history to Excel or clear it.
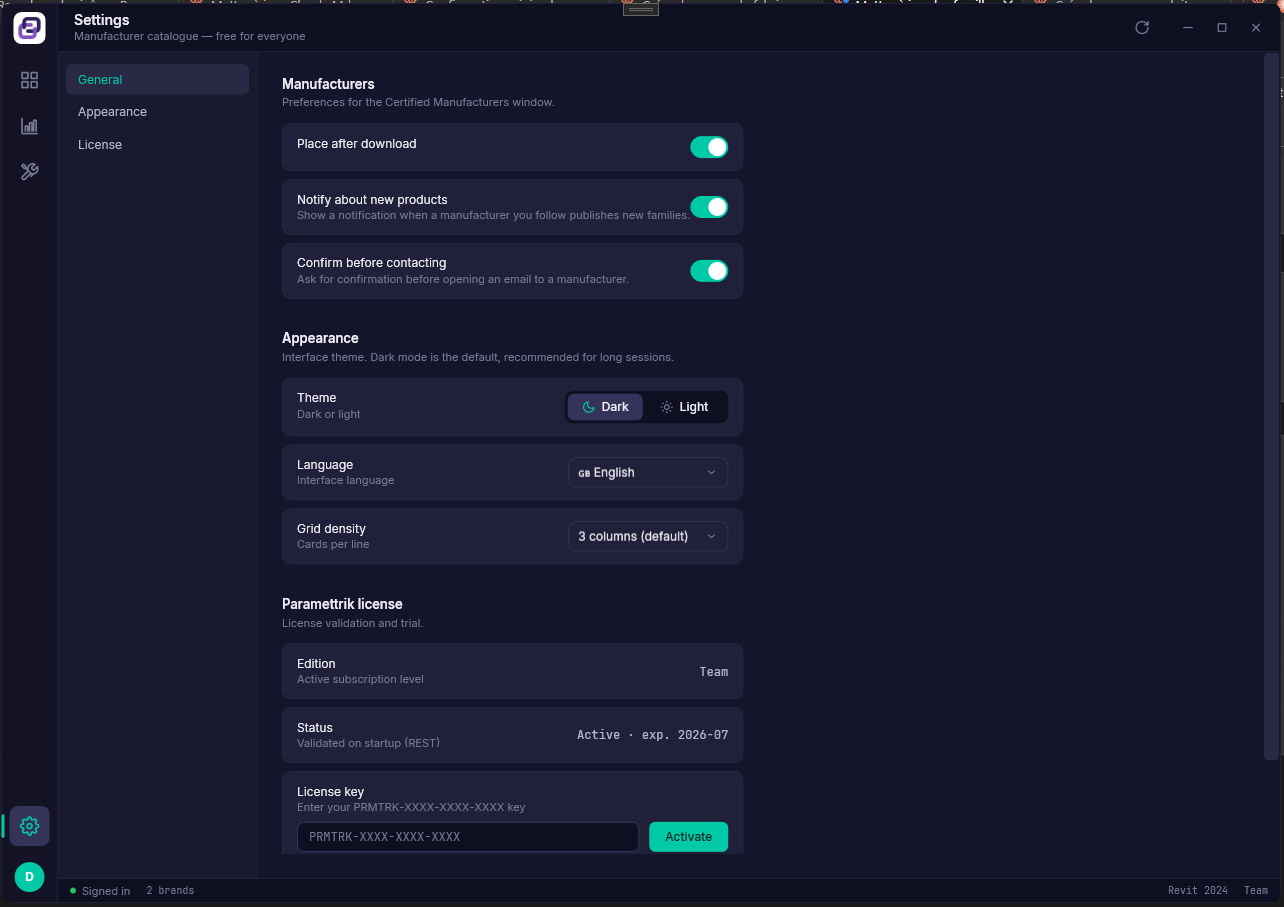
Settings lets you choose whether placement starts right after a download, whether you want to hear about new products from the brands you follow, and whether the Contact button asks for confirmation first.
Share and find families in the Community
The Community window is the shared library of everyone who uses Paramettrik Library. Browsing it is free with your account, and so is publishing to it: if you have built a family you are proud of, this is where it gets a second life. Downloading from the Community comes with the Library module.
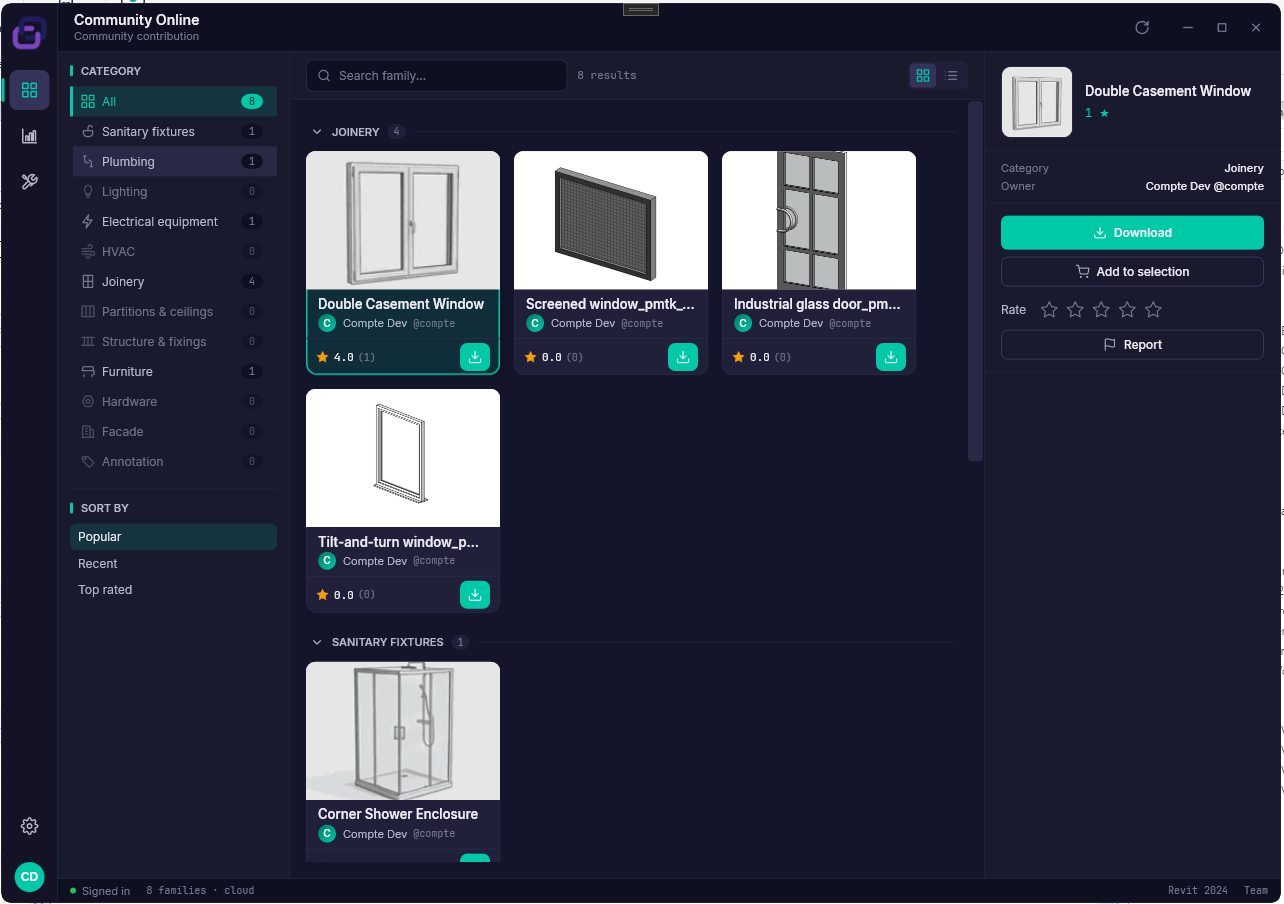
Families are grouped by category, and the sort buttons switch between Popular (most downloaded), Recent and Top rated. Select a family to see its details, its rating and its publisher in the right panel, rate it yourself with the stars, and bring it into your model with the Download button.
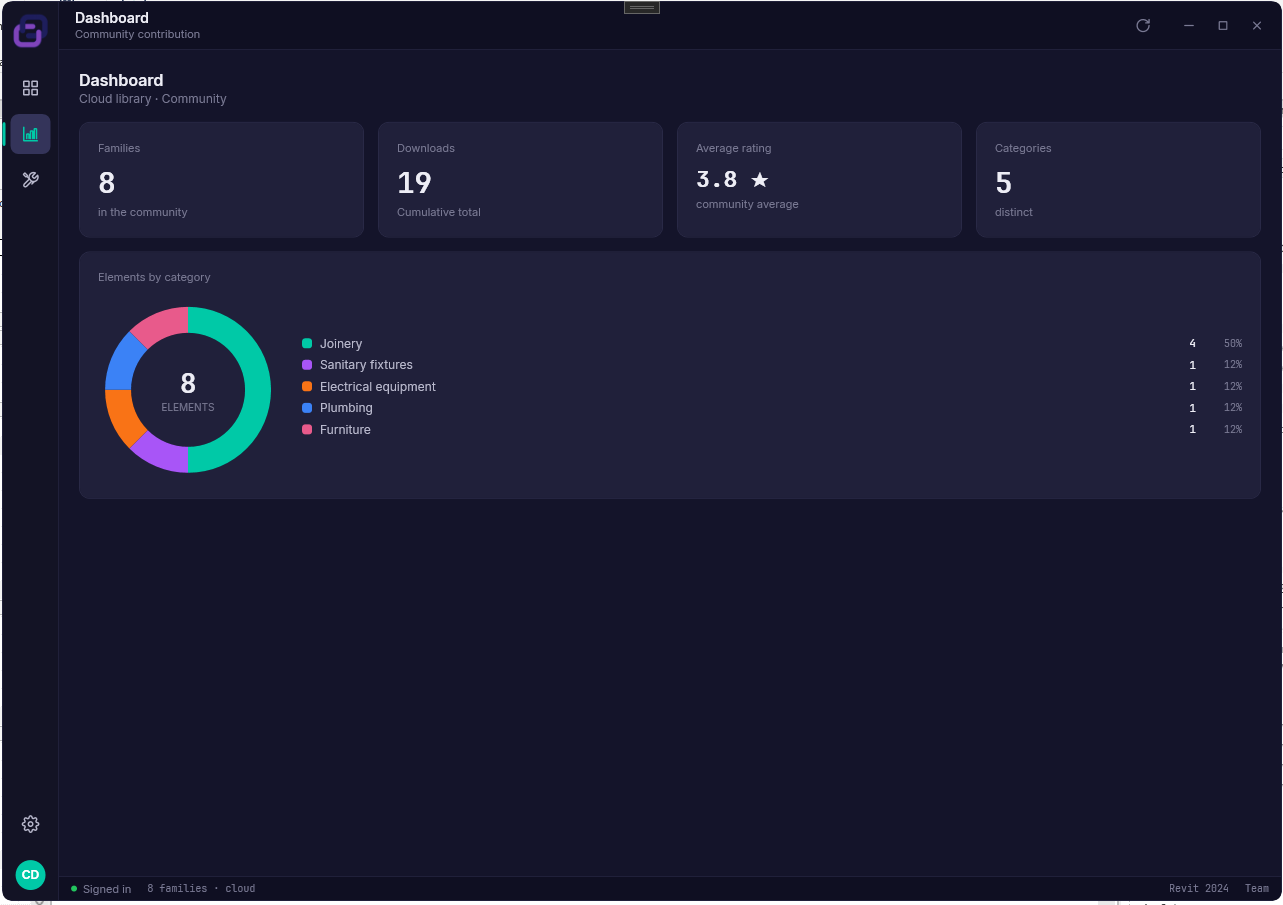
The Dashboard shows the pulse of the library: how many families it holds, how often they are downloaded, the average rating, and the donut of families per category.
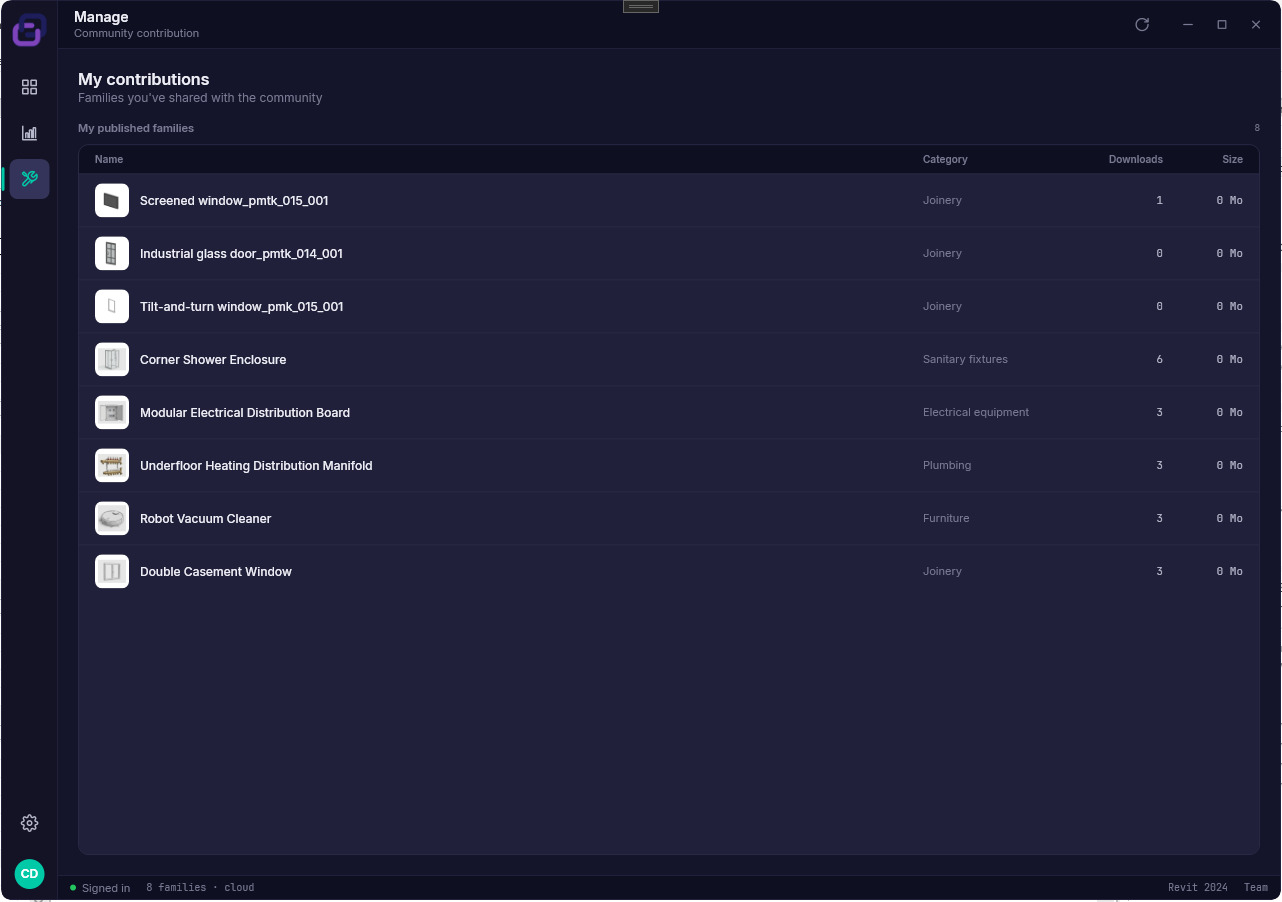
My contributions lists the families you have published, each with its download count and its review status. It is also where you look after them: rename a family or change its description, category and tags (applied straight away), propose a new version or new images (reviewed again before they replace what is online), withdraw it from the Community and republish it later, or delete it for good once it is withdrawn. If a proposal is refused, the reason is shown right next to it.
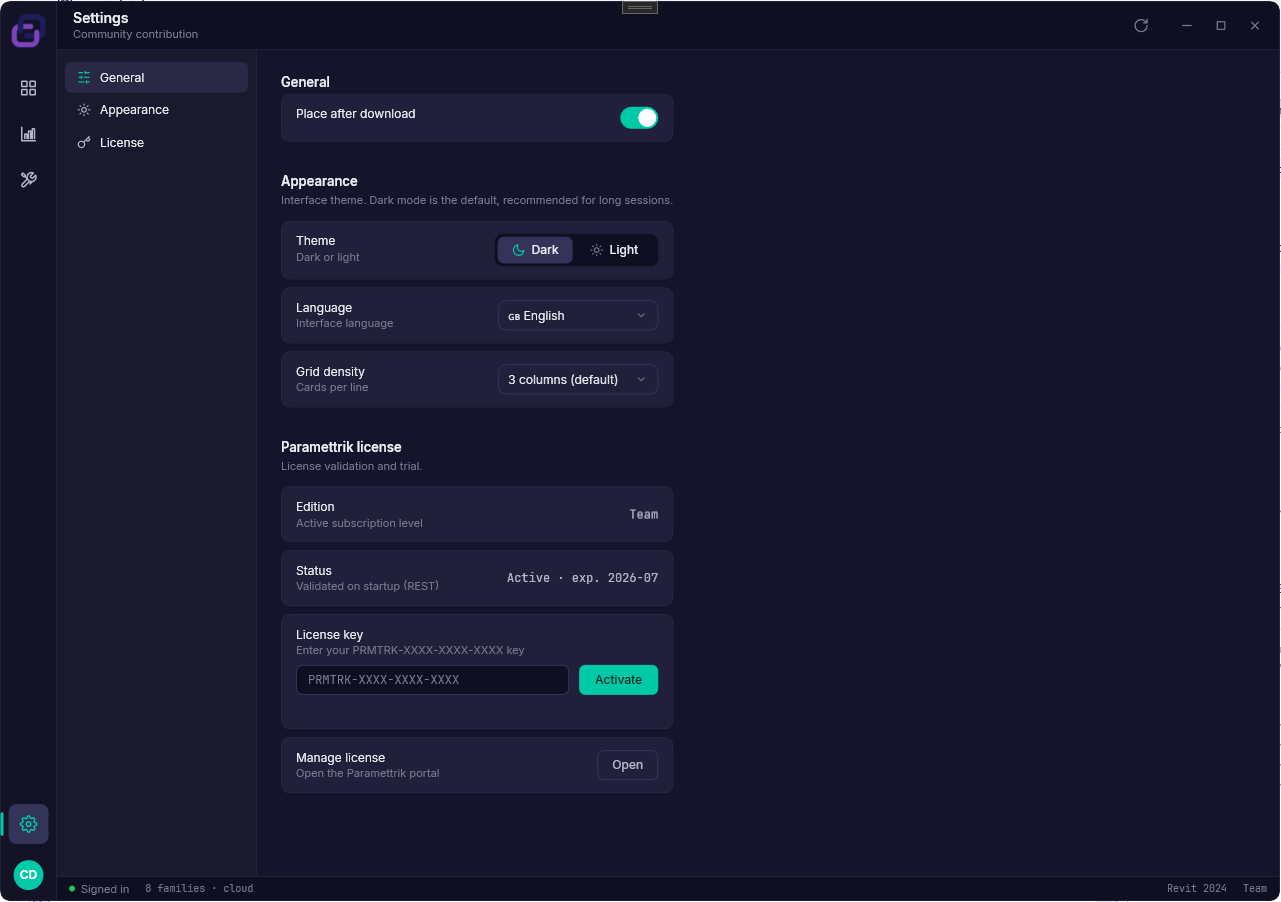
Two things to know before you publish, both covered in detail in How to publish a family: every community publication is reviewed by the Paramettrik team before it appears publicly, and it stays yours afterwards: you can withdraw it or delete it whenever you like.
Your team's private library (Organisation)
The Organisation window is a private, cloud-hosted family library shared by your team: everyone pulls from the same approved content, from any machine, inside Revit. It comes with the Library module, and every member of your organisation gets it automatically when they sign in. There is no license key to type; membership is the key.
Browsing the team library
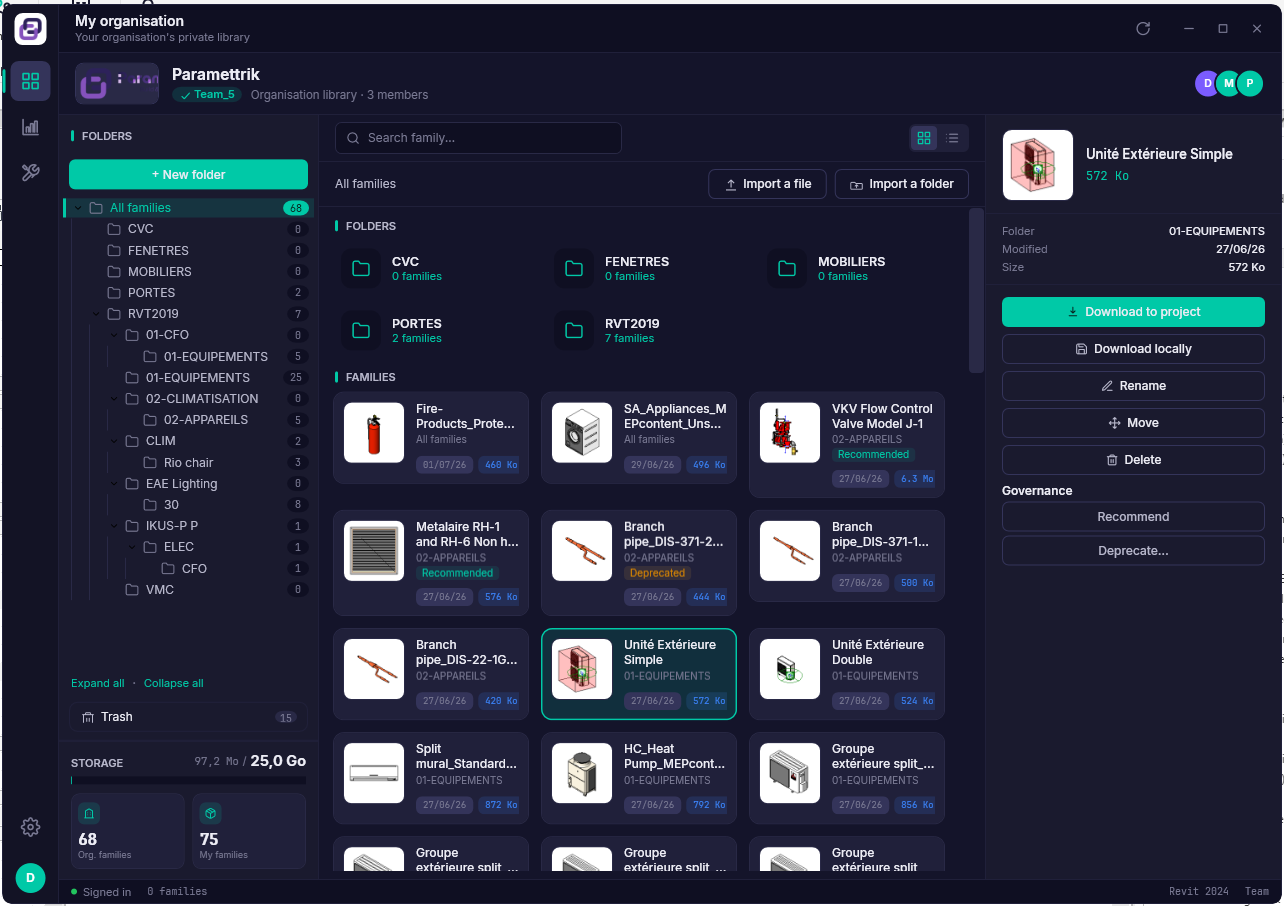
The header shows your organisation's name, plan and members. The left column holds the folder tree, which your team organises freely: create folders with New folder and shape the structure around your practice (by discipline, by Revit version, by project type, it is your call). Below the tree sit the Trash, where deleted items wait before final removal, and the storage gauge showing how much of your plan's space the library uses.
Adding content is direct. Import a file publishes a single .rfa into the current folder, and Import a folder publishes a whole folder tree in one pass, keeping its structure. That second button is how a team's existing library usually arrives: one afternoon, one import, done.
Select a family and the right panel offers Download to project (straight into your open model), Download locally (as an .rfa file on disk), and the usual Rename, Move and Delete for keeping things tidy.
Two badges can appear on family cards: Recommended and Deprecated. They come from your organisation's managers, who can mark a family as recommended to steer the team toward it, or deprecate one (with a note explaining why) to steer the team away, without breaking anyone's workflow: a deprecated family stays visible and downloadable, it just carries its warning. If you are a manager, the Recommend and Deprecate buttons live in the same right panel.
Dashboard, Manage and Settings
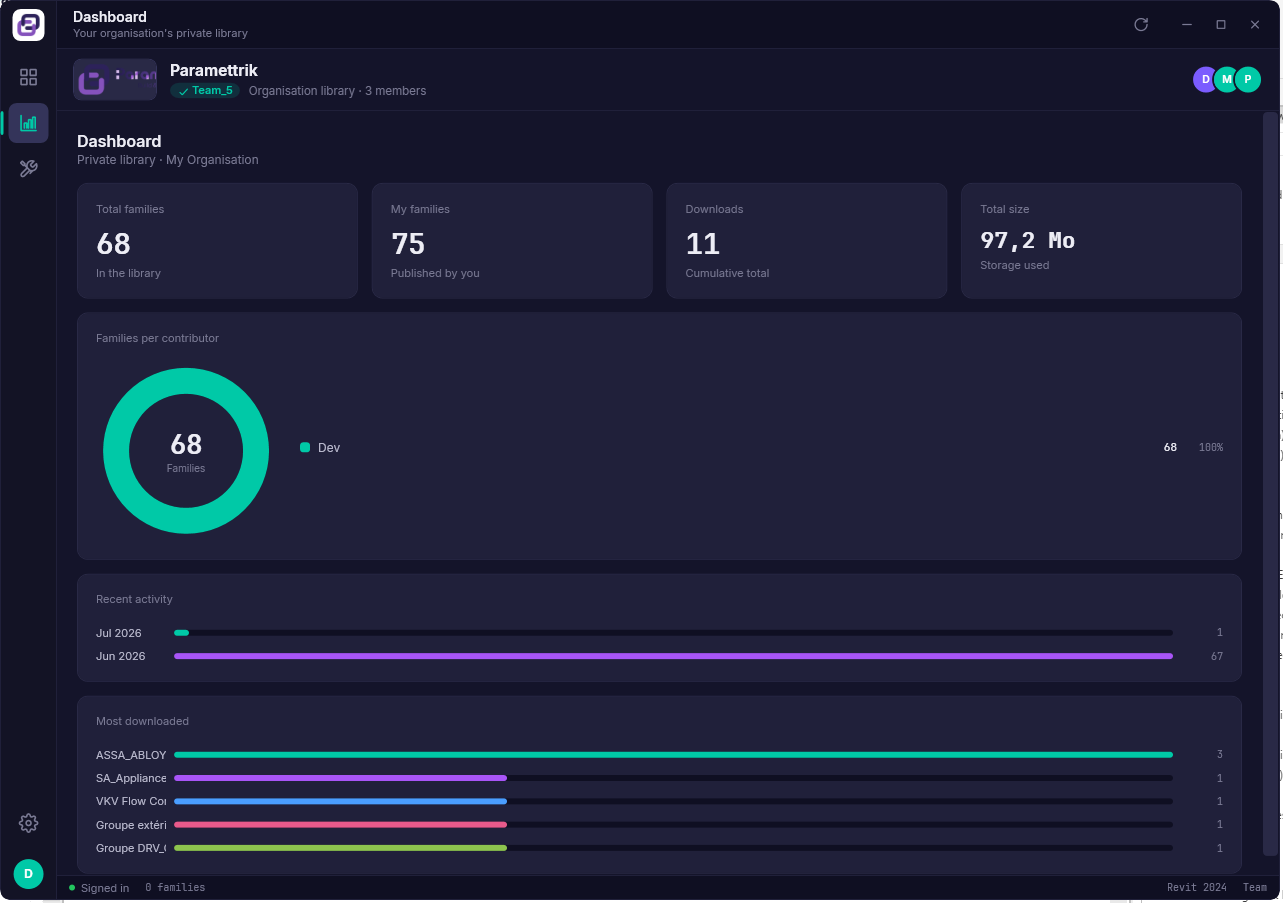
The Dashboard counts the library's families, yours among them, the cumulative downloads and the storage used. The donut splits families per contributor, the activity bars show the recent months, and the most downloaded families get their own ranking.
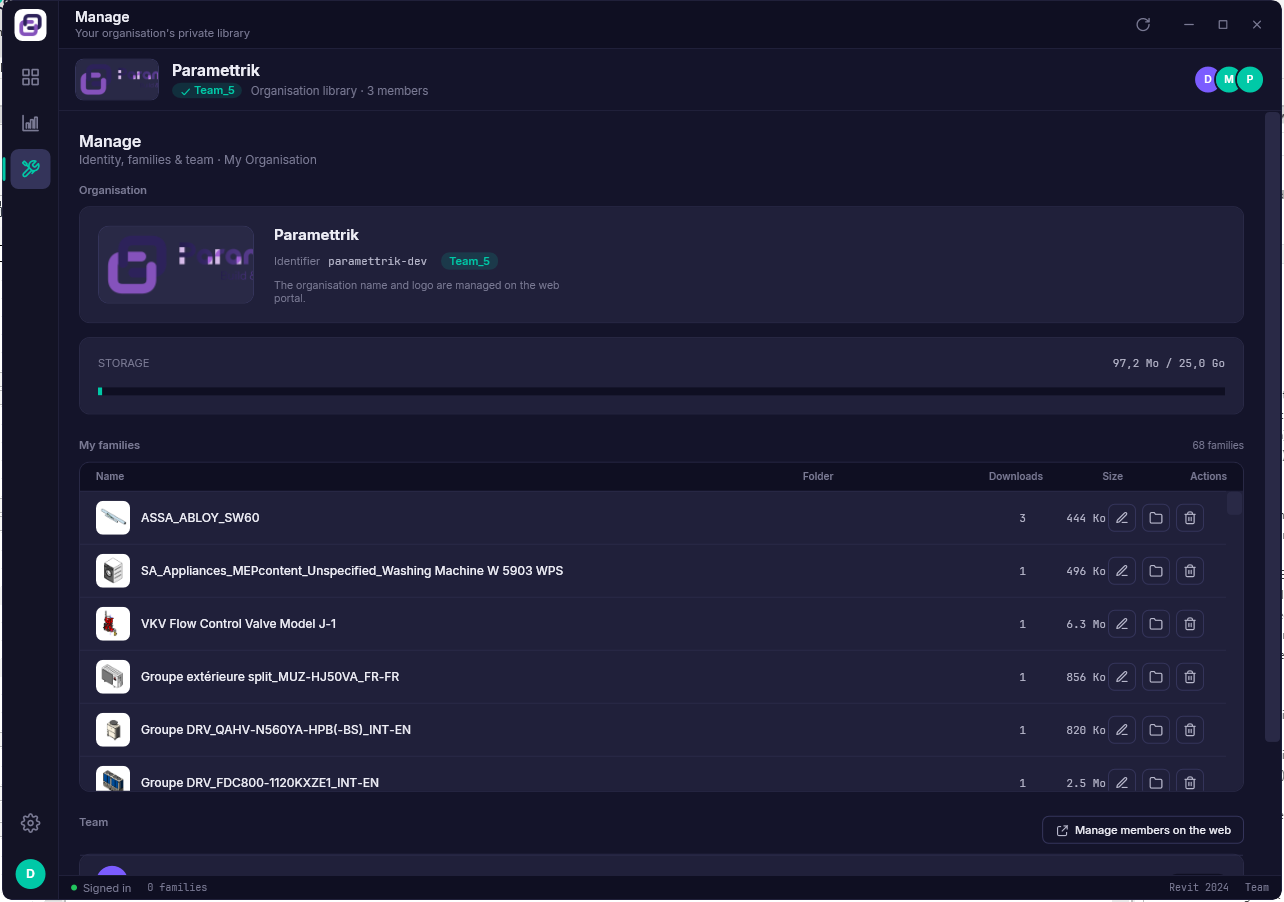
Manage shows the organisation card (its name and logo are managed on the web portal, not in the plugin), the storage bar, and the table of the families you published, with per-family rename, move and delete. The Team section lists the members; adding people, changing roles and managing seats happens on the web portal, one click away via Manage members on the web.
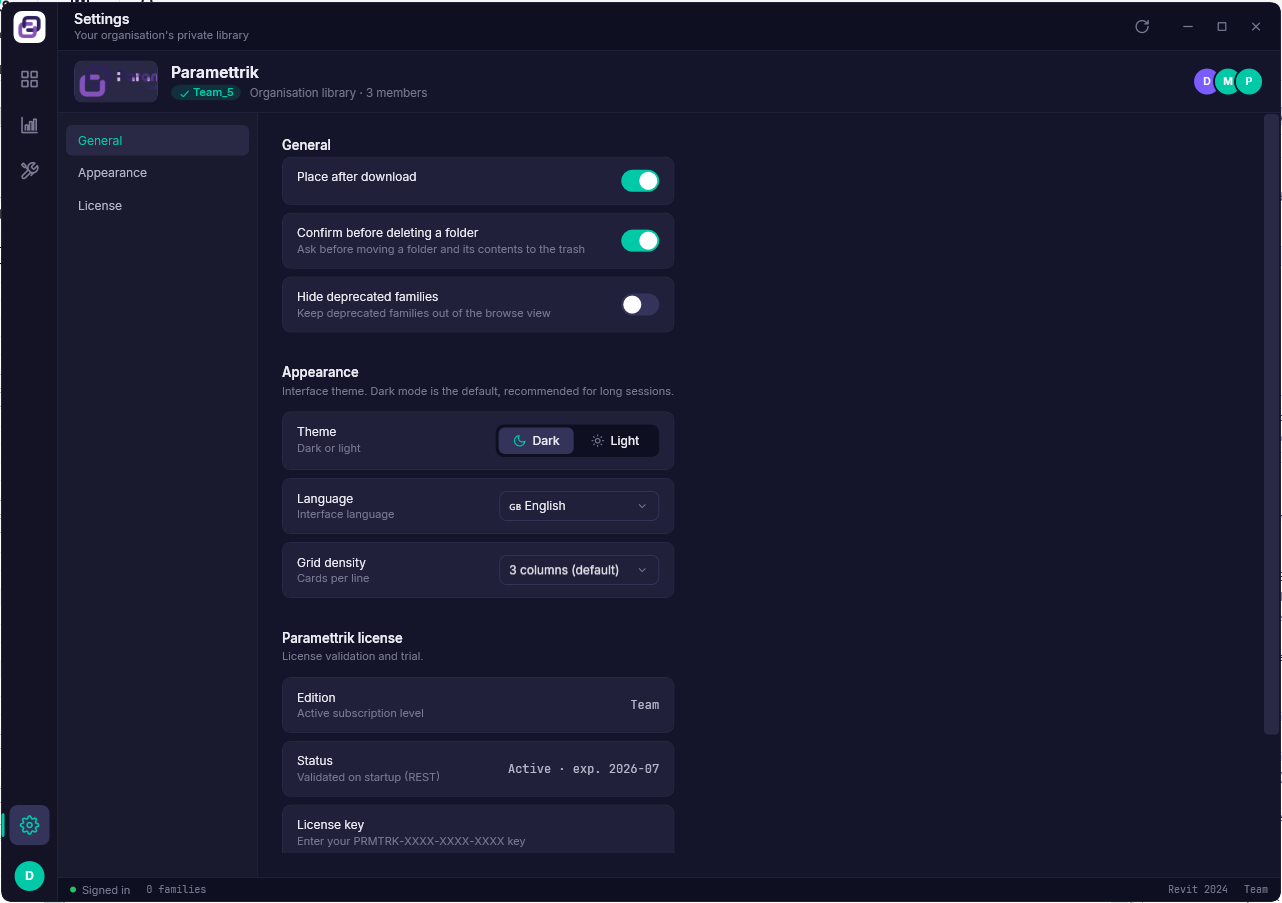
Settings adds two organisation-specific switches: Confirm before deleting a folder (a folder deletion moves the folder and its contents to the trash), and Hide deprecated families if you prefer not to see them at all in the Browse view.
How to publish a family
Publishing is how a family leaves your machine and joins a library, either your organisation's private one or the public community. The dialog is the same in both cases, and it opens from the Share button in the right panel of the three local browsers, or from the Import buttons of the Organisation window.
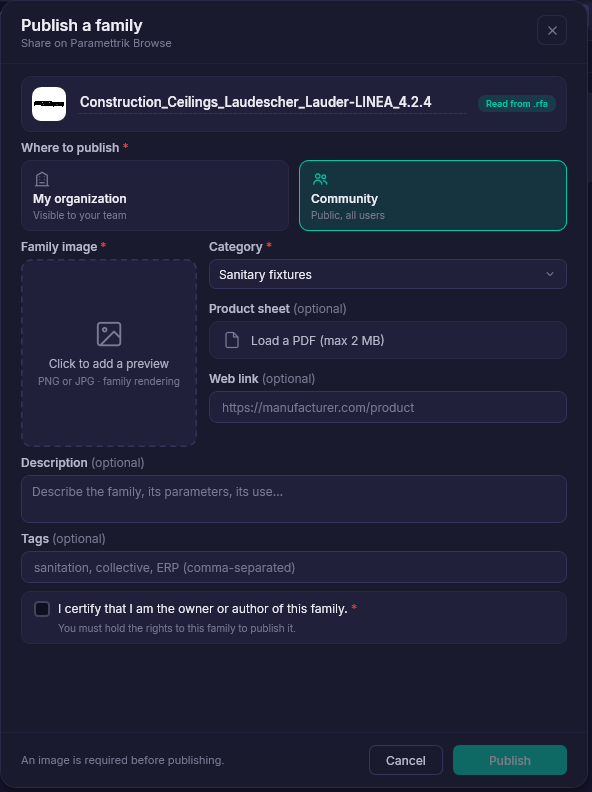
From top to bottom:
- 1The family. Its name is read from the .rfa file; you can adjust it before publishing.
- 2Where to publish. Two cards: My organization, visible only to your team, or Community, public to all users. Pick one.
- 3Family image. Required, and for good reason: in a library, families are chosen with the eyes. A PNG or JPG of the family rendering works best. The dialog will not publish without one.
- 4Category. Required too. Pick the one that fits from the list; it is how browsers group and find your family.
- 5Product sheet. Optional, a PDF up to 2 MB, useful for manufacturer content and technical documentation.
- 6Web link. Optional, for a product or documentation page.
- 7Description and tags. Optional but worth the minute: a clear description and a few comma-separated tags are what make your family findable in search.
- 8The ownership box. You certify that you own or authored the family. Publishing other people's work is not just impolite, it is what this checkbox legally rules out.
Click Publish and the destination decides what happens next:
- To your organisation: the family appears in the team library immediately.
- To the community: the family goes to the Paramettrik team for review first, and appears publicly once approved. This keeps the community library clean and trustworthy for everyone. The family stays yours: you can edit its details later, withdraw it or delete it from My contributions. Just know that people who already downloaded it keep their copy under the Paramettrik Community Licence: they may use and modify it in their own projects, commercial ones included, but never redistribute or resell it. So give it its best name, its best image and a proper description from the start. Publish it the way you would like to find it.
Tips from the field
A few habits that make Paramettrik Library feel twice as fast:
Search first, browse second. Every window has the same search bar in the same place. Typing three letters is nearly always faster than any amount of clever filtering.
Give the model a health check before every submission. Open This File, glance at the Dashboard donut, click the red Without instances filter, and deal with what you find. Five minutes, and the file you deliver is lighter and cleaner.
Make the theme and language yours, once. Any window, Settings, Appearance. Dark or light, and five interface languages. The choice follows you across every Paramettrik Library window instantly.
Let the Excel exports do your reporting. Each local browser exports its inventory in one click. A family audit that used to be an afternoon of copy and paste becomes an attachment.
Bring the office library in with one import. With the Library module, the Import a folder button of the Organisation window uploads a whole folder tree while keeping its structure. Your team's years of accumulated families can move to the cloud in a single afternoon.
No internet? No problem. The three local browsers work entirely offline, and your license has an offline grace period, so a site visit or a train ride never locks you out of your own tools.
Something not covered here? Write to us at support@paramettrik.com; the documentation grows out of the questions we receive.